
The Major Scale for Guitarists
May 23, 2026

The major scale is what I consider ground zero for understanding all other scales, chords, and chord progressions. Every chord on the guitar is named in reference to how it relates to the major scale, other scales are describe by how they differ from the major scale, and chord progressions/harmonic theory frequently use the intervals of the major scale to describe their component chord positions. For that reason, it’s a great place to start if you want to understand how your favorite guitarist is able to write that awesome riff or insane solo.
We use seven notes to construct a major scale. There are two pieces of information we need to construct any scale. The first is known as the root note, or tonic. You may have heard the phrase, “What key is that song in?”. The answer to this question is always the root note. It’s the home base of the scale, the tonal center if you will. It is also the starting point from which one derives the rest of the scale. The next piece of information needed to create a major scale, and any other scale for that matter, is the pattern of whole and half note steps that lead from one note in the scale to the next. If this is confusing, check out our article, The basics of music theory for guitar.
The first part of the above equation is easy, pick a note. It can be any note. Everything I’m getting ready to explain will work for every major scale in any key. To make life simple, I’m going to use the C Major scale. There is a reason I’m picking C and it will become evident in a moment.
The second part of this equation is the real magic. It’s the semitone pattern that we use to create the musical intervals for the major scale. This pattern is really the DNA of the scale. It’s what allows a listener to identify the scale and is distinguishable no matter what key you are using. Once again, if you’re not sure what semitone/tone is, please checkout our article, The basics of music theory for guitar.
Semitone pattern
In order to create a major scale from a root note, we simply have to follow a pattern of semitones and whole tones through the twelve semitones of an octave. That pattern is as follows: Whole Whole Half Whole Whole Whole Half, where whole is equal to two semitones and half is equal to one semitone.
As an example, let’s start with a root note of C as stated above, this will create the C Major Scale. I know this site is all about guitar and for the most part all the figures you’ll see will relate to the guitar. But the concept of intervals is better explained on a piano keyboard. Therefore, we’ll start there and quickly translate that information over to the guitar.
A crash course in keyboard layout
The piano keyboard provides the best visual representation of tones/semitones of any instrument. Therefore, we are going to use it to introduce the interval pattern for the major scale before moving on to the guitar. In The basics of music theory for guitar we learned that there are 12 semitones that make up music notation (7 natural notes and 5 sharps/flats). We also used the piano keyboard to show the relationship between the natural and accidental (sharp and flat notes). As a quick refresher, here is one octave on a piano keyboard.
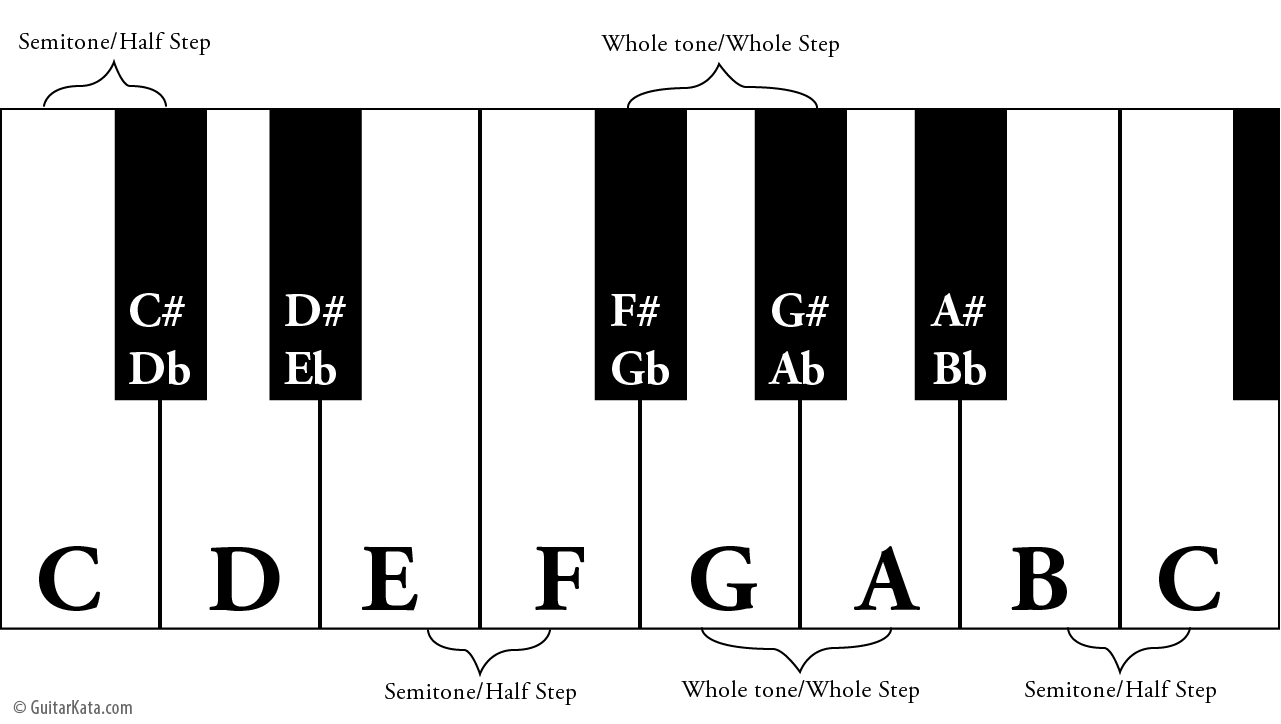
Figure 1: A piano is perhaps the best instrument to view the relationship of natural and accidental notes in music theory. The larger white keys are the natural notes, while the smaller black keys are the accidentals.
Notice that the white keys all correspond to natural notes while the black keys correspond to accidentals. Moving from one key to the next is equivalent to one semitone. For example, moving from the white key farthest to the left, C, to the next black key, C#, is one semitone. Moving to the next white key, D, would be two semitones away from C. Or, a whole step. These steps, or intervals from the C note are what we use to map out the semitone pattern we learned above. (Whole Whole, Half, etc…) Take note of the two special cases between E/F and B/C. These two notes have no sharp or flat between them. Now that we have a basic understanding of the piano keyboard, let’s map out our C Major scale.
Mapping out the C Major Scale
Starting at the leftmost key, C and advancing a whole tone, we skip over the black key, C#/Db, and land on our second tone in the C Major scale, D. Next, we take another whole step skipping over D#/Eb and landing on E. The next interval in our pattern is a half step/semitone.
At first you might be tempted to say the next note will be an E#/Fb, but that would not be correct. As we learned above, there are two special intervals; one between E and F, the other between B and C that do not have a sharp or flat. Therefore, the next note in the C Major scale would be F. Moving on, the next interval is a whole step which would be a G, followed by another whole step to give us A, followed by yet another whole step to give us our seventh and final note in the C Major scale, B. The final step in the interval pattern is a half step which in the special case between B and C will give us our C an octave higher.
You may notice that the C Major scale contains no sharps or flats. This is the only major scale that has that feature, and the reason we’re using it as an example. It’s also the reason I recommend learning the major scale first in the key of C. It can be very daunting to learn all the different positions of the major scale on the guitar. When you’re first learning, being able to find the nearest natural note makes it much easier in my opinion to fish around for the right notes until you’ve mastered the interval patterns.
So now that we’ve mapped the major scale interval pattern on the piano, let’s move on to our instrument of choice, the guitar.
Single string major scale
Now that we’ve seen the major scale on the piano, how do we apply this to the guitar? We know what notes make up the C major scale, C D E F G A B C. We just need to find every instance of those notes on the fretboard. In my opinion, the best place to start is to play the scale ascending on a single string. The easiest string to map out our C Major scale is the B string. (Second from the bottom).
Starting on the first fret we find the root note of the scale, C. We simply use the interval pattern from above letting a half step be one fret and a whole step be two frets. The first interval in our pattern is a whole step, two frets. This gives us our second note in the scale, the third fret. Continuing on we make another whole step to fret five, followed by a half step to fret 6, then three more whole steps for frets eight, ten, and twelve. Finally, we make one more half step to land on the octave at fret thirteen. So to recap, the C Major scale played on the b string of the guitar uses the following frets: 1, 3, 5, 6, 8, 10, 12, 13. Congratulations, you’ve just mapped out the C Major scale on the B string.
If you’re not sure how the guitar frets map to music notation or if you had trouble understanding this last paragraph, checkout our article The basics of music theory for guitar.
Remember, all scales are cyclical, so you can continue the interval pattern up the B string. That would give you the remaining frets of the C Major scale for the B string, 15, 17, 18, 20, 22, etc… The Whole Whole Half, Whole Whole Whole Half interval pattern is something you should commit to memory as soon as possible.

Figure 2: The C Major/Am diatonic scale on the second (B) string of the guitar. The blue dots are the C (root/tonic) notes while the green dots are the A (relative minor) notes.
Expanding to the other strings
we’ve completed a single string, what about the other five? Well, all you have to do is locate the C note on each string and repeat the pattern again. Once you’ve mapped out all the notes for each string, you’ve got every note in the C Major scale on the fretboard. Let’s start on one of the E strings, they will both use the same frets. Starting at the twelfth fret, we have an E, working down two whole steps, four frets, gives us a C (eighth fret).
Now we simply use our Major interval pattern of Whole Whole Half… to find the frets for the E strings. They are as follows. 8, 10, 12, 13, 15, 17, 19, 20, 22. Now, to get the frets below the eighth fret, C, we can do one of two things. We can run the interval pattern in reverse, or we can do some subtraction. I find the subtraction method to be the easiest. We know that the twelfth fret is an octave above the open string, so all we have to do is use the frets above the twelfth fret and subtract twelve from them to get the notes of the lower octave. ( e.g.: 13 - 12 = 1). Using this method, we can take the frets 13, 15, 17, and 19 and subtract 12 from each to get frets 1, 3, 5, and 7. These are the rest of the notes for the E strings.
Repeating this process for the remaining three strings will yield the entire C Major scale on the fretboard. For a little head start, you can find the C on the G string at fret five, at fret ten of the D string, and fret three of the A string. In my {free scales book} I’ve included a blank template of the fretboard that works great for mapping out these scales. I highly recommend you print these blank templates out and do this exercise by hand. It’ll help engrain the scale patterns into your brain.

Figure 3: The C Major/Am diatonic scale on all strings of the guitar. The blue dots are the C (root/tonic) notes while the green dots are the A (relative minor) notes.
Major scale shapes
We have now filled in the entire fretboard diagram for the C Major scale and it looks daunting to memorize. When I was first learning the major scale I remember feeling defeated because I was having trouble memorizing the entire fretboard. It wasn’t until much later that I realized there is a trick to make this process much simpler. It turns out that there are scale patterns that you can use learn every scale. These patterns allow you to break up the major scale into digestible parts. It also allows you to stop thinking in single notes and instead to start thinking of the major scale in composable shapes. One of the most common ways of doing this for a diatonic scale is using the three note per string scale patterns.
Three note per string patterns allow us to play linearly up and down a diatonic scale on multiple strings instead of ascending or descending a single string. In a diatonic scale there are seven different three note per string scale patterns, one for each note in the scale. To find them, we simply start on the low E string on the root note, eighth fret. We then look at our scale diagram and play the first three notes on that low E string. ( 8 10 12 or C D E ). Next, we move on to the A string and find the next note in the scale, F (eighth fret). We then play the next three notes in the scale diagram starting on the A string, eighth fret (8 10 12 or F G A). Continuing to the D string and searching for a B ( ninth fret), we complete the first octave by resolving the interval pattern on the tenth fret of the D string, C, one octave above where we began.
To complete the first pattern, simply repeat this process down every string. The figure below shows the first three note per string pattern for the C Major scale.
Figure 4: Starting on the low E string, eighth fret (C), we work our way through the C Major scale 3 notes on each string. Once you complete the third note on a string, move to the next string and find the next note in the scale. This allows you to play up and down the scale easily between the strings instead of ascending or decending a single string.
To find the next three note per string pattern, instead of starting on the root note, or tonic, start on the second degree of the scale. This degree is known as the supertonic. In the C Major scale, the supertonic is D. On the Low E string, the D is located at the tenth fret. Start there using the same method as before. Below you’ll find a diagram of the second three note per string pattern.
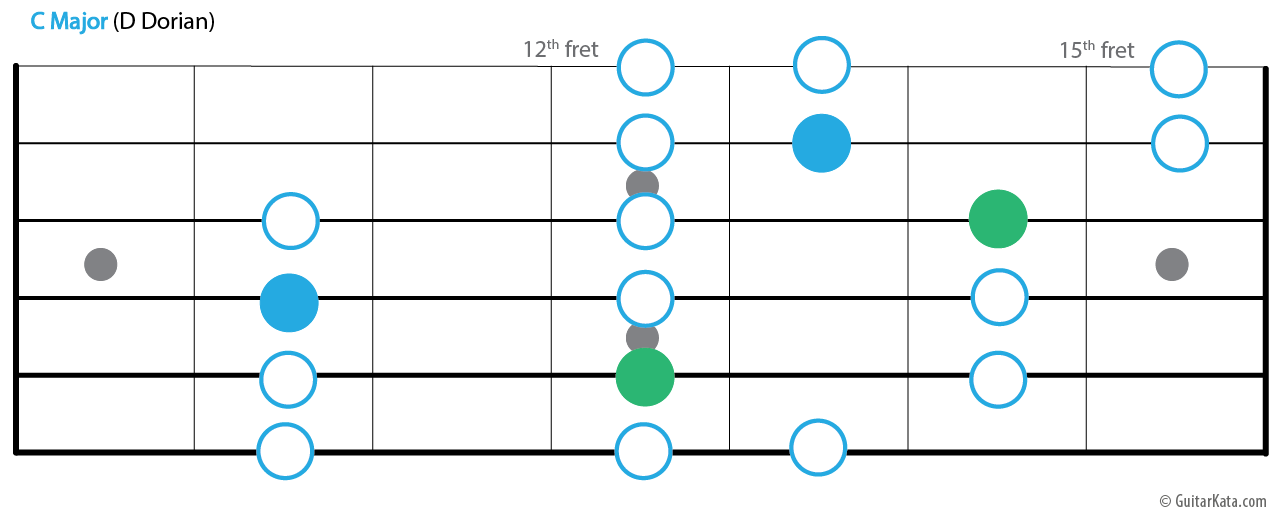
Figure 5: Repeating the steps for Figure 4 but instead starting on the low E string, 10th fret (D), yields the second 3 note per string shape.
If you continue this process up the neck to the third (mediant, figure 6), fourth (subdominant, figure 7), fifth (dominant, figure 8), sixth (submediant, figure 9), and seventh (leading tone, figure 10) degrees of the C major scale, you’ll soon run out of fretboard. The solution is to move back to the lower octave and work back towards the eighth fret where we began. Remember, all scales are cyclical so any time you run out of fretboard just go back to the first fret and continue up to where you started. The rest of the C Major scale three note per string diagrams can be found below.
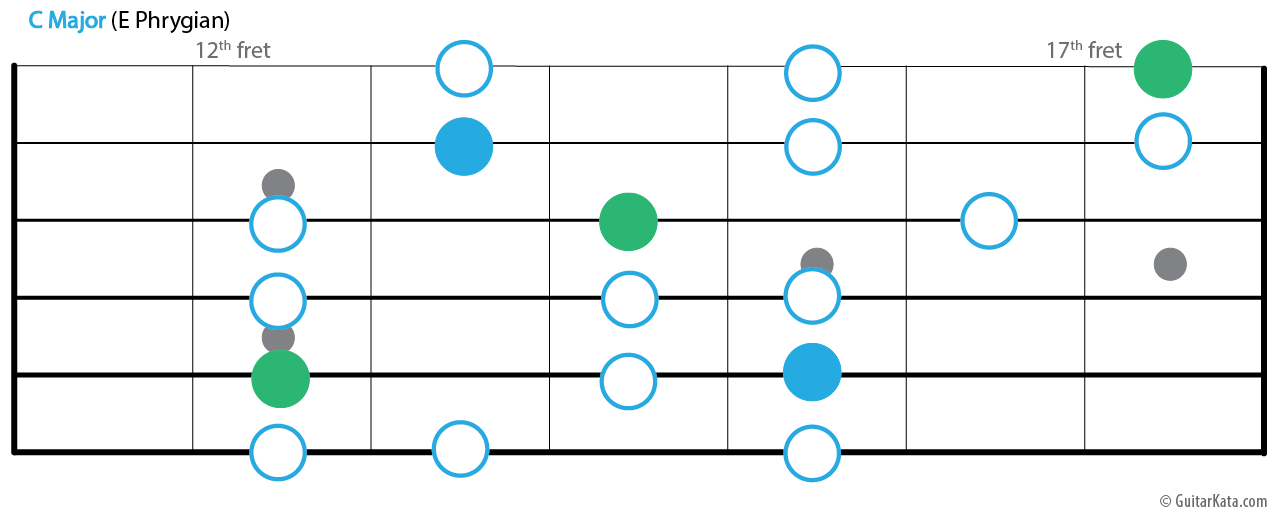
Figure 6: Starting on the Major third, E (Low E string 12th fret), repeat the same steps as figures 4 & 5 to map out the phrygian pattern.
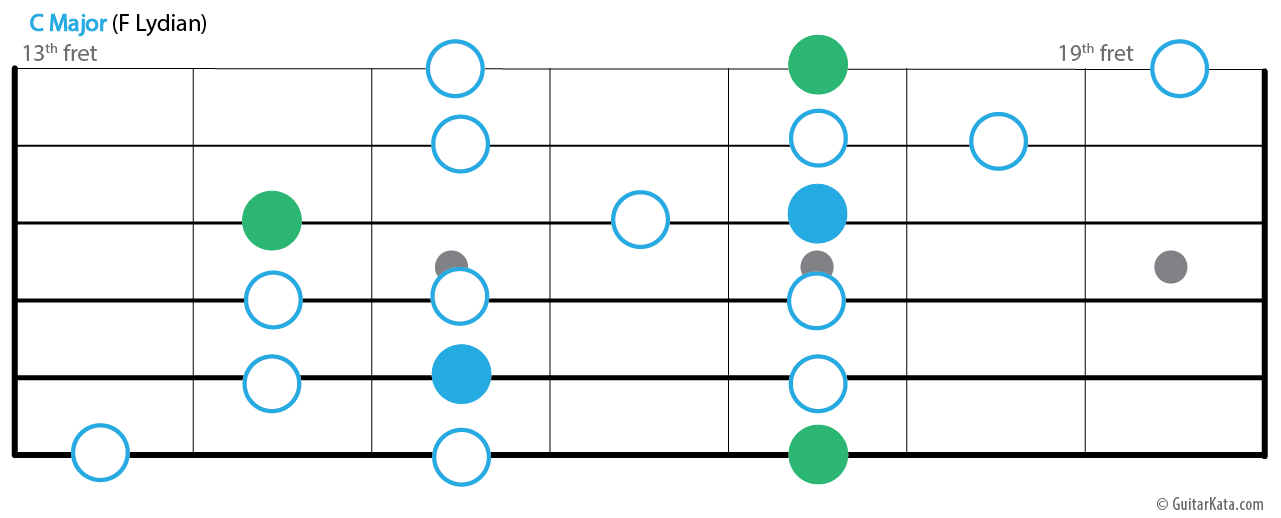
Figure 7: Start on the fourth, F (Low E string 13th fret) and once again repeat the steps from figure 4.
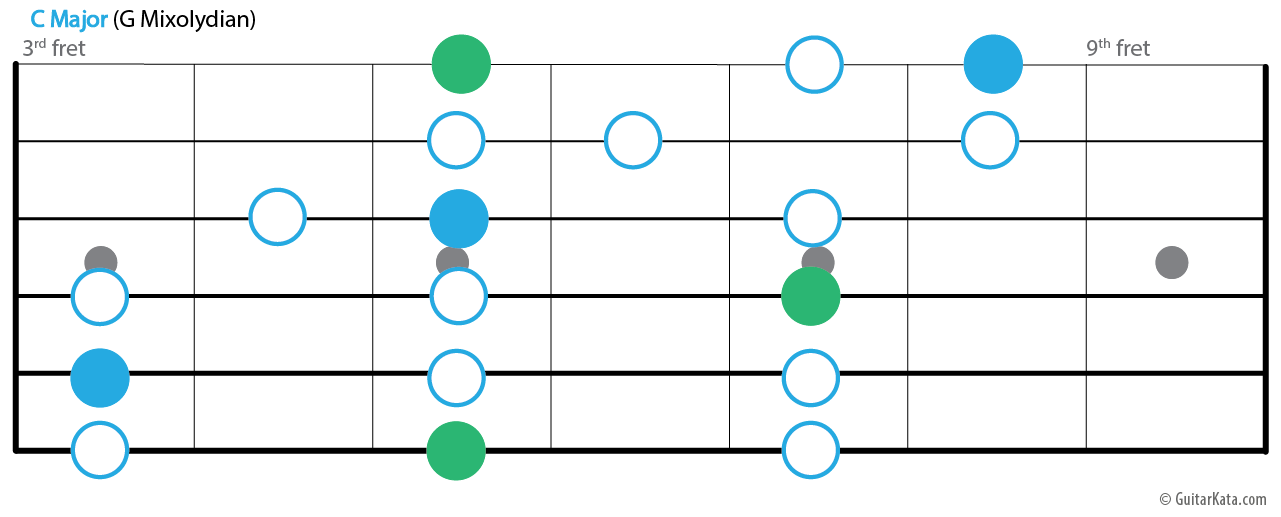
Figure 8: Start on the fifth, G (Low E string 3rd or 15th fret) and repeat steps from figure 4.
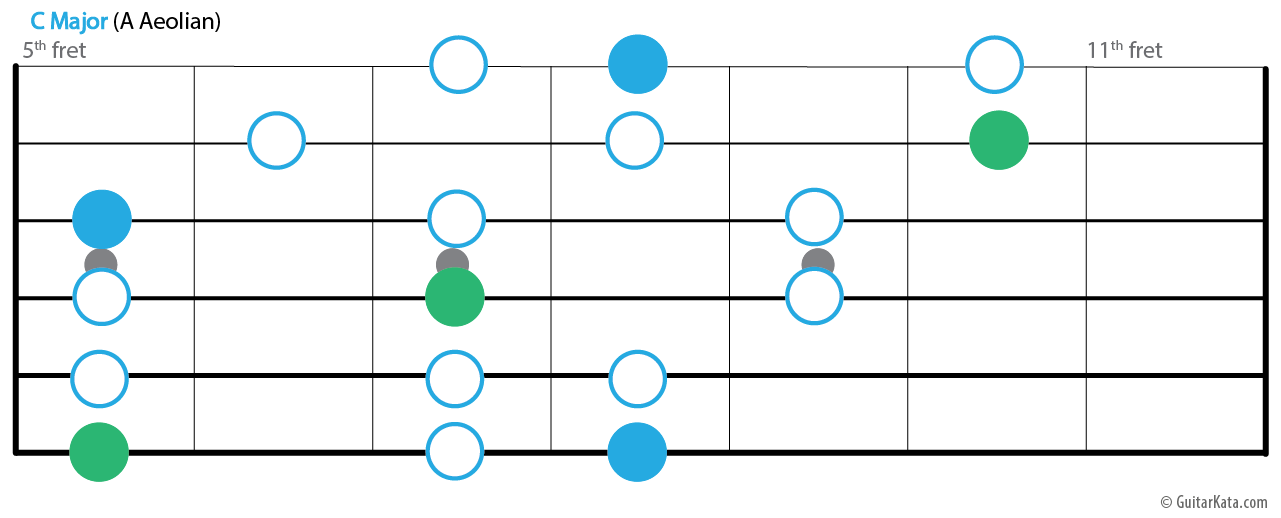
Figure 9: Start on the sixth, A (Low E string 5th fret), and repeat steps from figure 4.
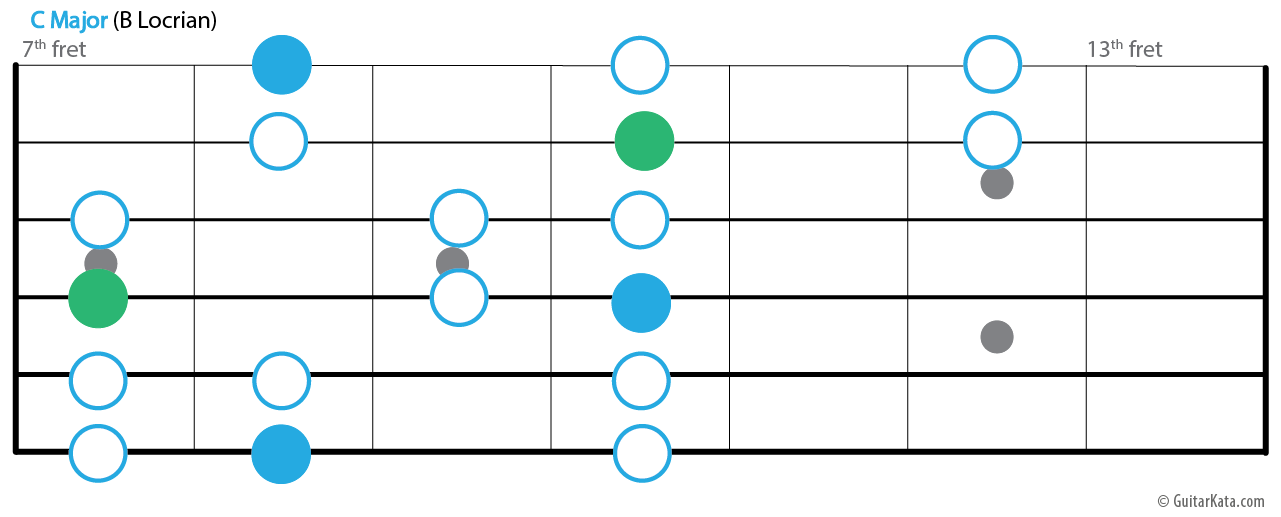
Figure 10: The final of seven shapes, once again start on the seventh, B (Low E string 7th fret), and repeat steps from figure 4. Once completed, you'll notice you are right back where you began in figure 4.
After completing the remaining three note per string patterns, my hope is that you’ll feel much better about memorizing each of the scale pattern shapes. By breaking down the fretboard into digestible sections, it is a much easier feat. Also notice how these shapes overlap and fit seamlessly together.